Fondant

Charity Donation Birthday Cake

This week I am going to tell you about a little girls birthday cake I made. But first I'm going to tell you why I made it. I'm going to talk about a sick little boy named Vinnie.

Vinnie was born with a rare genetic condition called SMA Type 1 - he requires breathing support and a feeding tube and he cannot swallow. He is also somewhat immobile and receives physical therapy. It is ultimately a terminal condition. Vinnie is 16 months old.

Vinnie's is certainly not the only child with this rare illness, but his particular story has been featured in the press and been written about by other bloggers.

If you'd like to learn any more about Vinnie you can check out the Our Boy Vinnie Facebook Page,

There is currently no approved treatment for Vinnie's condition, but there is a drug on trial. So far there have been incredible results. Children on the drug seem to be able to walk, dance, swallow and live long beyond their prognosis. I'm not a doctor or a medical researcher, but I do appreciate these things take time. There isn't a drug on the market that doesn't have side effect and it is irresponsible to release medication to the public that hasn't been rigorously tested. But, as Vinnie's mother herself has pointed out, these children already have a terminal diagnosis. A little more quality of life in the time they have would be a miracle.

There is a petition to push to allow children with SMA Type 1 to be given the chance to walk on their own, eat and maybe more. The petition is to give terminally ill children access to this trial drug. I know Vinnie's family would be extremely grateful if you felt that you could sign it.

our boy vinnie

Children with Type 1 SMA rarely make it to 2, many don't make it to 1. Despite this, the British Government doesn't offer any financial assistance until disabled children reach 3 years old. Vinnie is under the care of 3 different hospitals and there is obviously some free care on the NHS but there is a lot of equipment and other things that the family needs. Which they have had to fund themselves.

And that is where I - and this cake - come in. Vinnie's Mum Kelly and I went to school together. She started running a series of raffles to raise money for a specialist car seat, buggy etc. Equipment meant to make Vinnie's life a little more enjoyable and make it a little easier for his parents to care for him. She asked if anyone had anything to donate.

I offered up a cake. It isn't much, but we can only do what we can with what we have.

The lady who won the raffle was a lovely Mum looking for a birthday cake for her little girls 5th birthday party. It was pretty good timing as her birthday was around a month after the prize was drawn.

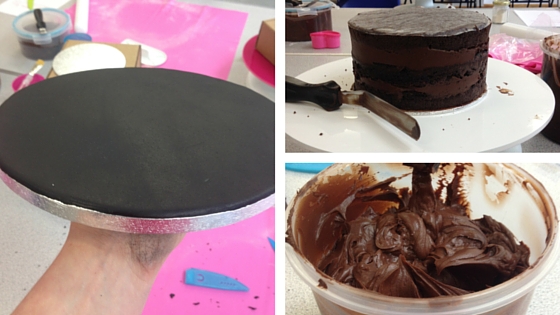
This has honestly been one of my favourite cakes to make to date. I liked the bake, the recipe was great and tasted fab. I enjoyed the fondant covering process despite the weather (more on that later). It was very pressured because this was for a little girls party and I wanted it to be wonderful. But I gave myself (almost) enough time, so I didn't feel too rushed.

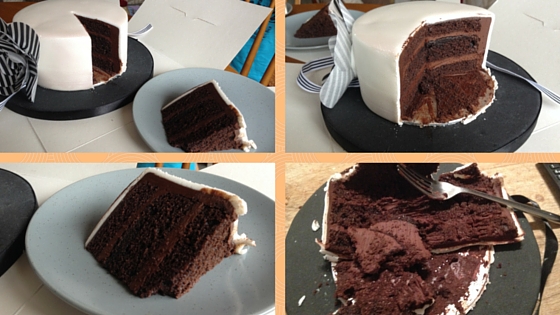
They decided to keep things simple flavour-wise and went for a chocolate cake with vanilla buttercream. I went with the Chocolate Madeira Cake from SheWhoBakes and my favourite Swiss Meringue Buttercream by Sweetapolita.

Keira, the little girl, loves Charlotte's Web and there was no shortage of inspiration on Pinterest. In the end, the birthday girl opted for elements from 2 different cakes, a barn and a spiders web with some fondant figures. A number '5', a pig and a spider, naturally.

This was my final design.

Cake Summary Final

And here is my final interpretation of this design.


Charlottes Web Birthday Cake

It isn't perfect - but I don't know a cake maker who ever feels their work is. But I have to say I am pretty happy. I'm proud of the little flowers, I think they really finish the cake. I'm also pretty chuffed with my fondant models too, I've only made one model before, so these aren't too shabby.

I'll do another post going into this cake in more detail. But for now these are the changes I'd make if I could go back:

  1. I'd spend a little bit more time smoothing. It just wasn't 100%
  2. Wider board and put either the Pig or the Spider down at the bottom.
  3. Cover the edge of the board in ribbon.
  4. Centre the name. I'd start with the 'E' in the middle of the web and work out
  5. When placing the top tier I'd make sure the centre of the web lined up with the centre of the barn door
  6. I'd take better photos!

The photo part is important, I assembled the cake at the venue. So I couldn't take pictures with a backdrop and what have you. But I could have spent a little more time and taken a better shot.

Anyway, let me know what you think of this one - any questions let me know.

Baking My First Christmas Cake Part 2

Welcome back to my Christmas Cake saga 2015

Just in case you missed Part 1 here is a roundup everything that has gone wrong:

  1. Not enough fruit for the recipe, I forgot to buy currants
  2. Not enough butter (sort of)
  3. Made the wrong ratio of the recipe, which is why there was not enough butter
  4. Forgot to add the Almonds to the mix

And here are some mistakes I forgot to mention or discovered after I posted the Christmas Cake Part 1:

  1. My greaseproof paper was too high for my oven and needed snipping
  2. The oven was on 180 not 140
  3. My Bain Marie dried out

So I compensated by lowering the temperature to 110 and filling up the Bain Marie. I hoped the water in the oven made the cooking process gentle enough not to incinerate the cake.

It was false hope.

burned-christmas-cake-baking-fail


Christmas Cake Stage 5 - Crying

Ok, now that's over with...I do have my backup batter, thanks to mishaps 1 and 2 from yesterday's 'muck up' list.  So I baked that this morning.

With the almonds in, at the correct temperature, with a fully watered Bain Marie.

Success!!!

Christmas-cake-freshly-baked

Isn't it a thing of beauty! Even with my terrible photography!


Christmas Cake Stage 6 - Maturing

I've got another great tip from my baker pals on Facebook

Christmas-Cake-Maturing-tip

Thank you, Teresa!  A friend of mine makes her Christmas Cake in September. Then she feeds it Rum for 3 months and is, presumably, admitted to hospital for fruit-induced alcohol poisoning on Christmas Day. I don't have 3 months, I'll be lucky if I have 3 days, so this nifty tip on speeding up the cakes maturation is a winner for me. I just hope it works out ok!

Christmas Cake Stage 6 - Decorating

This is what I've been waiting for!!

In case you didn't know, the traditional way to cover a fruit cake is with Marzipan and then fondant. In order to get the marzipan to stick (as there is no buttercream or ganache) you paint the cake with a jam or preserve. Usually apricot. And as there are apricots in the cake (at least I didn't forget those) this seems like a good way to go. By that logic so would cherry jam, but I prefer apricot.

The last time I used marzipan I was in primary school and I don't remember enjoying it. I bought my marzipan, sacrilege I know, but I didn't have the time or mental fortitude to make my own. I initially rolled it very thin, worried I wouldn't have enough. It turns out I had plenty but one layer didn't really disguise the lumps and bumps. So I did 2 thin layers of marzipan, stuck together with more apricot jam.

Then came the one part of this process I was actually familiar with, fondant.

covering-a-christmas-cake

I'm not entirely sure why I took all of my photo's tilting to the right. Must have been all the brandy in the off cuts I was eating. And it isn't your imagination, the cake does also slope slightly - so not an entirely even bake. I did try cutting it a bit to balance it out but having so much fruit it in meant I was at risk of crumbling a whole chunk off.

I popped it up on a cupcake stand (the blue one you can see poking out) and that made it very easy to cover.  Then I did some embellishments.

christmas-cake-decorated

I couldn't help but be influenced by the biggest Disney movie of the moment, so we have a sort of ice crown with pearls and blue accents.

The design is an homage to the Sphere Cakes I made and CakeyBake who designed them. The little blue leaf shaped pieces were the cut outs from my floral snowflakes. I painted them with luster dust. You can't really see in any of the photos but I also lightly brushed the top of the cake with pearl dust and a little bit of silver glitter. The sides are wrapped with white and blue ribbon, left over from my Cinderella Button Cookies. Waste not, want not.

I boxed it up in a decorative silver box and delivered it to the school, hoping it would impress.

I'm actually pleased with how it turned out. I like the decorations and it's kind of cute.

Do you have any cake disaster stories? Cakes that started badly and ended up ok?


How to Make Icing - Every Kind of Icing

So much icing, so much choice.  So which one is right for you?

Last time I talked about the difference in the terms 'icing' and 'frosting'.  This time, let's have a look at the different types of icing, how to make them and when to use them.

This list isn't comprehensive, I'm sure any of you who have been to culinary school could name many I have missed, and please do! Add them in the comments. But this is a list of every type of icing I either have used or would like to give a go. All the icing I know about then really.

This is a BIG post, so settle in with a cup of tea, we're about to get sugary.

Royal Icing

Typically used for piping decorations or covering something like Christmas cake or decorating biscuits. If you don't colour it, Royal Icing is bright white and dries solid and crunchy. That means you can pipe little flowers or other decorations and keep them in a moisture free/air tight container for a long time.

For Piping:
675g icing sugar
3 free-range egg whites
3 tsp lemon juice

If you want it to dry softer, more marshmallowy then add 1½ tsp glycerine once the other ingredients are all combined.

  • Whisk the eggs until foamy and white but not solid.
  • Add sieved icing sugar in gradually and fold together.
  • Once all the sugar is combined add the lemon juice and any colour you would like.

Because this is designed to set hard for decoration, if you leave it out, it'll dry on you so keep it covered! This is the icing used for all that incredible lacework piping, brush embroidery and fancy beading. Not to mention being 'decorator glue' it's a super strong cake adhesive. So you can use it to mount edible decorations on your cakes.

Thin it out a little for 'flooding' biscuits but keep it thicker to pipe lettering. It's the original 3D printing!

royal-icing-excellence

Glace Icing

Great for pouring, especially for that dripping effect.  People top fairy cakes with it and dribble it on biscuits. While this does 'crust' over it rarely goes completely hard all the way through.

100g icing sugar
15ml water/fluid

  • Simply mix together until combined and smooth, not grainy. 

You don't have to just use water, it can be fruit juice for flavour and mild colour. Some people use milk.  You could use coffee or anything fluid (and edible). If you add food colouring, then reduce the amount of other liquid or it may be too runny.  This icing is nice and shiny and great fun for kids.

Oh, and it's what you 'glaze' donuts with too!

Glace-icing
Glace-icing

Buttercream

This basic buttercream recipe is only one in a whole delicious family.  There are other, more elaborate versions, whose texture and density are different.

600g Icing Sugar
250g Softened Butter
1 tsp Vanilla Extract/Vanilla Bean Paste
2 Tbsp Full Fat Milk or Cooled Boiled Water

  • Using a stand mixer or hand mixer (or incredible arm muscles) beat the Butter until creamy, fluffy and paler in colour.  
  • Add in the Vanilla and Sugar (gradually) until fully combined.  
  • You will need the mixture to be creamy and soft for piping or spreading between layers of cake so add the milk in a little at a time until you have a pliable consistency.  You may not need all of it, that will depend a little on the temperature / humidity wherever you are.  You do not want this to be runny. If it gets too thin try chilling it in the fridge or adding more icing sugar a little at a time.

This is where we cross over into "Frosting" territory.  A spreadable, pipeable cake covering with a butter and sugar base. It could also have cream cheese which is delicious. For a lighter, fluffier and frankly more delicious buttercream make it with a meringue base. This is where we start getting sophisticated.

There are a number of meringue-based buttercreams. If you're only familiar with meringue as the crunchy white stuff in a pavlova or gooey fluff on top of a Lemon Meringue Pie then you're thinking too far along in the meringue making process. I will do another post on the various meringue buttercreams as they are my absolute favourite, there isn't enough time to talk about them now and they deserve their own stage.

American buttercream, which broadly speaking is Frosting, typically includes one special ingredient.  Many 'frosting' recipes or American Buttercream recipes include 'Shortening'.  For those of us not raised in the US, shortening is refined white fat. Specifically refined vegetable fat. Refined animal fat is lard. You heard me, LARD!  And there are lots of reasons to use lard, but PLEASE do not put it in your buttercream. I use refined vegetable fat to grease my fondant mats and molds, loosen up my fondant and make dumplings, pie crusts and more!  The most famous brand here in Blighty is Trex, but there are others.  I feel genuinely unwell at the idea of mixing that in with butter and sugar to spread on a cake!  It's just fat.  Bleugh.

The above link uses Palm Shortening, which is presumably derived from same plants we get Palm Oil and Palm Sugar from. That sounds much more palatable. And if you are looking to increase stability and whiteness but don't want to use vegetable fat you could use set coconut oil. It's white and melts at a high temperature. It also tastes a little bit of coconut (obviously)

plate of cupcakes with different types of icing

Fondant

The apex (for me anyway) of cake decorating.  Here we really have 3 things, Fondant and Sugarpaste and then Gumpaste.  The first 2 are the same stuff, and that's what we will be talking about. Gumpaste however, is basically Sugarpaste but with 'gum' added. Either naturally occurring Gums derived from trees or Tylose, an artificial gum, which comes in powder form.  This makes it harden or dry out faster.  This is best used for crafting things like flowers, figures or bows and covering cake boards rather than a cake itself.

For me, there are 2 ways to make fondant, with Marshmallows and without.  I have a separate post on making MMF or Marshmallow Fondant (gosh, I do talk about icing a lot don't I), but here is the traditional kind.

1025g Icing Sugar (sieved, yes really)
1 tbsp gelatin
60 ml or 3tbps of Water
170g of Glucose or Corn Syrup
1 tbsp Glycerine
2 tbsp Trex (refined vegetable fat / shortening)
1 tsp of Lemon, Orange or Almond Extract - optional

  • First prep your gelatine. Put your water on a bain-marie on a gentle simmer in a metal or glass bowl.  Add the gelatine and let it soak for about 5 minutes. Don't hard boil it or the gelatine will be unusable. 
  • Mix in the Glucose/Corn Syrup and Glycerine gently.
  • Then add in the Trex,  gently stirring until it is melted.
  • If you want to colour or flavour your fondant, do that now. It's much less work than kneading it in later. 
  • Put your sieved icing sugar into a big bowl and make a well in the middle. Add the gelatin mixture and mix together with a non-stick utensil. Either a heatproof silicone spatula or grease your wooden spoon with a little Trex. Mix until it comes together. It won't be fully integrated and smooth, just yet. This part is a little like the first stage of making bread.
  • You can do this part in a stand mixer with a dough hook or paddle but don't overwork it. You will also still have to finish it off by hand. I've never had a totally smooth fondant straight out of the mixing bowl.
  • Once it is holding together tip it out on a non-stick surface. Whatever you have, a wooden cutting board, decorator mats or plastic/stone worktop - grease it with Trex. You won't regret doing it.  Knead until smooth and flexible. Wrap in cling film and/or sandwich bags - it can't hurt to pop it in an airtight container too.
  • Don't refrigerate this, keep it in a cupboard. Making it cold means it'll get damp when you bring it back up to room temperature, and that will make it sticky.

There is SO much to say about this. Firstly, this is a complete Fondant recipe, from scratch. You can buy Fondant Sugar, which is the same consistency as Icing Sugar or Confectioners sugar and add water to it. That makes rollable Fondant, at about 1tsp of water for every 50g of sugar it's easy to make.

Secondly, we are a Pork-free household in my home, and MOST commercially available gelatin is Pork based. You can get Beef gelatin, but I've found it is much more expensive. You can also get vegetable based gelatin derived from seaweed. I've heard horror stories about using it for some things and great praise for others, I've never tried it so I'd love to hear if you have and how you got on. If you are making MMF, as Marshmallows are already made with gelatine and glucose (beef gelatine Marshmallows are readily available) that takes care of that part of the recipe. I prefer MMF for taste, texture and it's MUCH easier to make.

Also, I don't know why it offends me less to have Trex in a Fondant recipe than a buttercream one, but it just does. You can substitute it for butter, but don't expect your fondant to be bright white, it will be ivory. If you are colouring it anyway then this doesn't matter too much.

You can find Corn Syrup in some large supermarkets, but I haven't seen large quantities of glucose anywhere but cake shops and online. If you do use Corn syrup then use less water, it's runnier so you won't need as much fluid. I use a brand called Karo, and I buy the light kind. It has less sugar, which seems a bit redundant considering all the other sugar, but that's my brain for you. It's also clear, which is very important when making white fondant. Many corn syrups or other plant based syrups, like Agave, are either slightly yellow or slightly brown. That's fine when substituting it for sugar in a cake, but it will affect the colour of your fondant.

fondant-icing
fondant-icing

Pouring Fondant

This I've seen mostly used for petit fours or glazing, but you can use chocolate for those too and that's easier to make! In my head, this sits in the realm of the patisserie and is therefore beyond my skill level. For now anyway.

750g icing sugar, sifted (yes, you really do have to sift it)
125ml water
2 tablespoons golden syrup (or other plant based syrup, as long as it is viscose)
1 teaspoon almond extract

  • Mix the sugar, water and syrup in a saucepan over a medium heat, stirring constantly.
  • When the mixture reaches 35°C (use a Candy thermometer) and is fully mixed take it off the heat. Be careful, a saucepan of boiling sugar is a hospital trip waiting to happen
  • Add any colour or flavour now and mix gently (but quickly) so as not to crystallise the mix

It should be runny, so you can pour it over a cake but not so thin that it'll just run off and not stick at all. Also, if you are pouring over a cake you have covered in buttercream, allow the mixture to cool first. You can colour or flavour this however you want, making it great for decorating.

It can set glossy or mat. It will firm up and crust as it dries, so cracks beautifully when eaten. But it won't be hard.

pouring-fondant
pouring-fondant

Honourable Mention - Ganache

My new best friend. Ever since I took a class in covering cakes in ganache I have been torn. I'll admit it, I've totally been seeing ganache behind buttercreams back. I am still in love with the Meringue Buttercreams, though.

Ganache is really versatile, you can make it a thin glaze and pour it instead of Pouring fondant, it is gorgeous for dripping over the edges of cakes in place of Glace Icing. You can make it thick to fill and cover stacked cakes or whip it up to pipe on cupcakes instead of buttercream. Plus, you know, it's chocolate.

So with that in mind - and the fact that this is a crazy long post already, I'll do a separate post on Ganache to do it justice.

What is your favourite kind of icing? Have you used any of the above in a 'non-traditional' way?

*Header Image: Royal Icing by A Passionate Plate - Glace Icing by Dough It Yourself - Buttercream by Martha Stewart - Fondant by Cookies Cupcakes and Cardio - Pouring Fondant by Auifine Foods

Ganache Covered Layer Cake, Wafer Flowers and Fondant Part 2

Ah welcome back kindly blog readers. My last post was about a class I took to improve my cake decorating skills.  This is the exciting conclusion.  I may be overselling this a bit.

I'm always interested in making more professional looking cakes.  I'm a hobby baker, I don't sell cakes, I don't think I could take the pressure. None the less I want my cakes to look like I could.  I took the class to focus on getting that perfect finish on the coating layer whether that be ganache or buttercream.  I have long known the secret to covering a cake in fondant smoothly is a perfect coating on the cake.

That was the second thing I wanted to achieve. A perfect fondant layer.  I usually find myself disappointed with my fondant covered cakes because they just aren't perfect.  I end up with puckers or little tears, wrinkled fondant which is called elephant skin (nice).  I had turned to making my own fondant which helped a bit but this class really gave me confidence, so I shall tackle my next fondant project with gusto!

The class covered the following:

covered-cake-board-dark-chocolate-ganache

  • covering your cake board
  • cutting & stacking a cake
  • making ganache
  • filling a cake with ganache
  • covering a cake with ganache
  • achieving that perfect sharp edged ganache finish
  • covering a layer cake in fondant
  • creating a lustre dust painted finish
  • making and applying wafer paper flowers.


chocolate-ganache-cake-montage

Phew, that's a lot - probably why it took all day.

I did say last time that I wasn't going to give away any of the actual guidance from the class, that's only fair.  I paid to learn and Kirsty earns a living from teaching it, so stealing her Intellectual Property would be unkind.  BUT one tip I will pass on is that patience does seem to be the trick with ganache.  We all spent a considerable portion of the class covering and smoothing our cakes. That is fine in a class, and most of us there are the perfectionist type, so we took the time to get it right.  I just hope I can get faster because I won't always have all the time I want to cover a cake.

*Update* I have since covered a couple more cakes in ganache and I'm getting MUCH quicker - so practice makes perfect.

It has to be said, much to my husband's delight (he is not Team Buttercream), I may never buttercream a layer cake again - fill it yes, cover it no.  I'm a ganache girl now.

Aside from anything else the cake I took home was yummy

ganached-cake-eating-montage

Oh and I enjoyed the experience of taking a class so much I've booked myself on another one.  If that's not an endorsement then I don't know what is.

I'd love to hear about your class experiences and recommendations!!

fondant-covered-cake-with-wafer-paper-flower

Ganache and Wafer Flowers - My First Cake Decorating Class Part 1

On Saturday 13th June I live tweeted the first ever professional cake decorating class I've ever taken. It was fun, a little tiring but very insightful & not just from a cakey perspective.

The mix of students in the class I took was interesting, there were seven of us all together & we broke down like this.

1. 2 professional bakers (made cakes for money) one full time, one not.

2. An engineer who doesn't do much decorating but is helping a friend make a wedding cake

3. Enthusiastic hobby-ist and first time class taker

4. Professional cake class taker, or at least she had taken classes with this instructor before

5. A Financial Industry professional who describes cake making/decorating as a 'hobby on steroids'

6. Me, hobby baker & blogger.

Oh & all women.  I don't say that for any reason other than it was true & partly because I expected it to be the case.  Make of that what you will.

cake-decorating-tools

The class was taught by Kirsty, the mastermind behind CakeyBake, you can also find her on Facebook, it was a full day class & covered many techniques (more on that in my next post)

I don't intend to give away any secrets from the class, but if you want to know more you can always contact Kirsty on her website, or hey, why not take the class yourself.

I would definitely recommend that by the way. Kirsty herself is fun & energetic while keeping 7 wayward cake ladies on track when we were chatting.  Her teaching style is effective & she explains things clearly, whilst also demonstrating them.


I watch a lot of teaching / cake demo videos on youtube and I've bought a fair number of Craftsy classes but for me there was definitely something brilliant about a live class situation.  It isn't just being able to ask questions (although that is handy) it's being able to watch what your instructor is doing from a couple of angles, there were a few of us bobbing around behind her and next to her to watch how she did something.

cupcakes-with-sprinkles-in-a-box

If I had one criticism, and I feel like I've started writing a review here so I should present a balance, it's that if I got stuck and asked for help close up Kirsty would oblige.   She would explain and demonstrate again what to do (she is an incredibly patient woman).  That doesn't sound like much of a criticism I know, in fact, most of you are probably saying 'what on earth would you expect her to do?' it's a fair question.  What I mean is she would complete the step for me, up close on my cake so I could see.  I learn well by watching, I learn better by doing and in those instances where I needed more help, I would have liked to have completed the step myself, with her guidance.  That way I definitely know I can do it.  It's not a big deal and I'll practice these skills again on my own anyway.

I was totally blessed by my cohorts on Saturday, the Pro's had more tips and advice to add to Kirsty's extensive knowledge, the ladies who'd taken other cake classes had info they'd picked up and one other, my 'hobbyist on steroids' well I could have become best friends with her brain.  She pitched in regularly with gadgets she'd tried or techniques discussed by other instructors and even the latest change in EU law concerning the use of IPA when creating luster dust "paint".

ladies-in-baking-aprons

One of the highlights of my day was definitely lunch time.  That sounds bizarre as I have lunch every day, but it was a great opportunity to just sit and talk with everyone, Kirsty included.  We talked about cake.  I am not often surrounded by people who want to discuss the finer points of baking, the laughter and tears.  That feeling when a cake sinks or you pipe a perfect rose.  We all have other things in our lives, even those who baked for a living so cakery isn't the be all and end all but it's something we all loved.  As with any conversation about a 'love' it quickly turned to horror stories.

Imagine a sunny wedding day, a bride preparing for her big day, excited about all the little details.  And her cake.  She has asked a trusted baker to make the cake she will serve her guests.  The cake that will stand proud in the reception venue, the cake that will have photo's taken of it as though it were a celebrity. The baker, who doesn't usually do wedding cakes, has taken care and patience over making this cake perfect.  She is also about to leave for a holiday abroad, on the same day as the wedding.  With a car packed for the airport, the cake is carefully loaded.  They leave home, stomach full of nerves, boot full of fondant and sponge.  They turn the first corner at the end of their road and there is a sickening sound. A box sliding, tipping, falling.  The baker stops the car and her worst fears are confirmed.  The cake has fallen.

We all commiserated, hands over our mouths, lumps in our throats.  It's a tale to chill your bones and your icing.

Check back in with me for my next post and more information on the class itself.