
The Secret to White Buttercream

Cinderella Button Sugar Cookies

Dried Apricot And Cinnamon Mini Bundt Cake

2 Tier Chocolate Madeira Birthday Cake
I have had a number of firsts in recent weeks, this cake amongst them. Join me as I walk you through my designing, baking and decorating process with this cute birthday cake.
This month I made my first Wedding Cake and my first birthday cake for someone I didn't know directly.
It's been interesting. And not as stressful as it might have been. I'm not saying it was stress-free mind you!
Settle in with a cup of tea folks, this is a long one.
Earlier in the year a friend of mine put out a request for raffle prizes to raise money for specialist equipment for her terminally ill son. I offered to make a cake. She had such a lovely outpouring of prizes offered that it was June before the raffle for the cake was drawn. By which point I'd already committed to make a Wedding Cake for 2nd July. I've never made that many special cakes that close together.
The winner of the raffle was especially thrilled as her little girl was having her 5th Birthday Party on 9th July. I figured that once I was back from the wedding (we were spending the weekend there) I'd have 4 days to bake and decorate. I hoped that would be enough. I'm not a professional, so I'm sure there are lots of you pro's out there laughing at me being concerned 4 days might not be enough for just 1 cake.
Designing The Cake
So the lovely lady contacted me and we talked about flavours and themes. My day job is somewhat creative so I at least knew how to put a brief together to find out what kind of cake to make.
I offered a limited series of flavour choices. I wanted to keep this cake well within my skill set. Making a charity cake for a little girls party is not the time to be experimenting outside my comfort zone! I cheekily borrowed some Cake Flavour Picker graphics and put together this flavour choice chart.
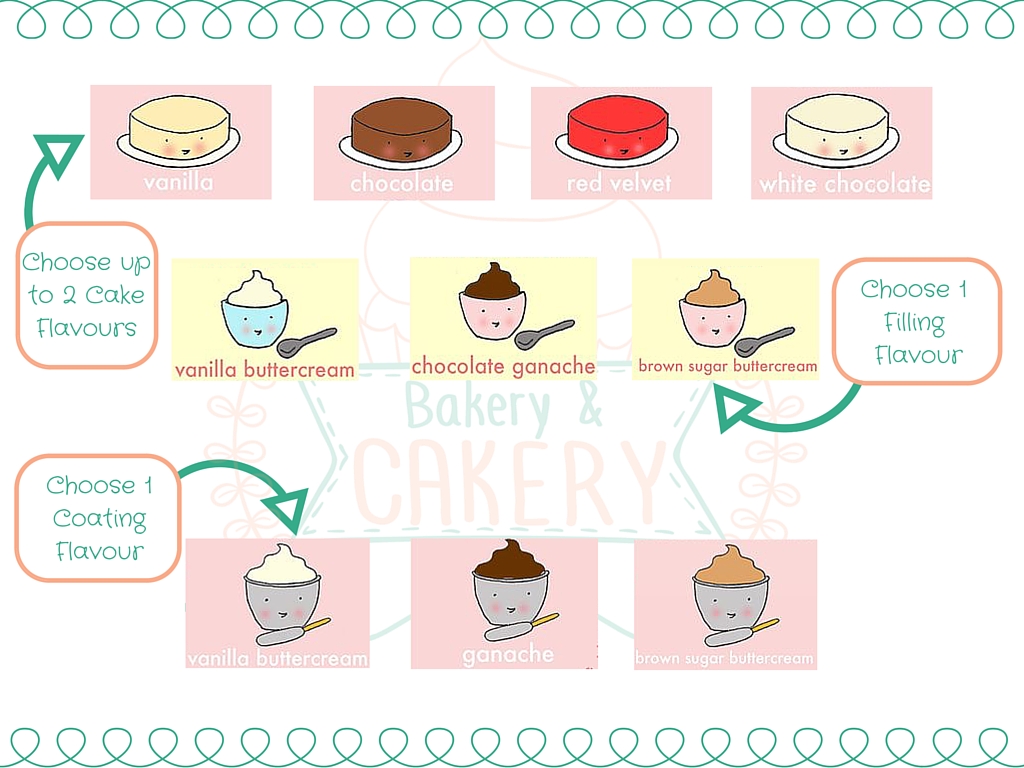
cake-flavour-chart-simple
They opted for a Chocolate Cake with Vanilla Buttercream - a classic combination. I did offer to make them something not on this list if there was a particular cake or icing that they loved. I realise this undermines the point of offering a set choice anyway, but I'm weak like that, ha.
I also established the theme of the party, likes and dislikes of the birthday girl, the time and location of the party and any dietary requirements or restrictions.
I made the models on day 1 of my 4 days. I haven't made many models before and thought if anything was going to go wrong, it would be them. The pig (Wilbur) I copied straight from a picture I found online and I love how he turned out. Charlotte, I sort of made up. I supported her very thin legs with toothpicks and made them separately. I made little holes in the body to insert them into. Her eyes were little almond shapes, she is a girl spider after all and put her mouth on at a jaunty angle. I didn't get any good photos of her, which is a shame. Her head was one ball and her body another. Sadly she didn't quite survive the journey and her legs started to break at the bend when I was setting the cake up.
Baking The Cake
Knowing I had to feed roughly 30 kids and that I needed to transport the cake just over an hour away I based the cake itself on the She Who Bakes Madeira. At the bottom of her recipe, is the conversion to Chocolate Madeira. You substitute the plain flour with cocoa powder and add melted chocolate.
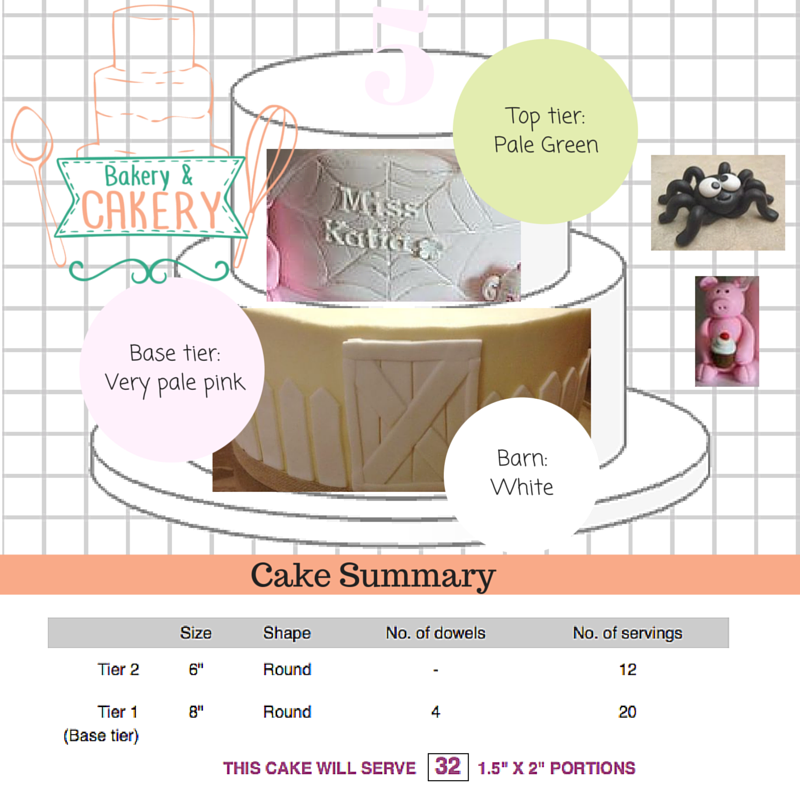
charlottes-web-cake-design
Madeira is a sturdy cake without being dense and firm without being dry. This makes it ideal for layered cakes and tiered cakes.
The original recipe is for a 7inch tin but I needed enough for 6inch and 8inch cakes. I wanted them to be at least 4 inches tall when they were finished, so I needed 3 layers of cake at least 1 inch tall. That plus the buttercream filling, outer coat and fondant on top would be roughly 4 inches tall. This would make the stacked cake roughly 8 inches tall. Which I think is impressive to look at.
I scaled the recipe up and used the weighed egg method to come up with the following recipe, which filled both my 6 and my 8inch pans nicely.
642g Golden Caster Sugar
642g Unsalted Butter
642g Self Raising Flour
11 Medium Eggs
3 1/4 Tablespoons Vanilla Extract
160g Cocoa Powder
321g Melted Dark Chocolate
These are the instructions from Britt's She Who Bakes blog, I've augmented them with a few of my own comments and tips, but credit here to Britt.
Cream together the Butter and caster sugar until lighter in colour and fluffy
Beat your eggs in a bowl first then add them into the Sugar and Butter mix
Once the eggs are integrated add in your flour and chocolate powder.
Add the vanilla and melted chocolate.
Mix for 4-6 minutes on a high speed.
Pour mixture into your, lined, tin. Fill to roughly 3/4 full. Add an extra circle of greaseproof paper on top.
Add water to the bottom of your oven, in a heatproof bowl or tray. Bake at 140C for 1 hour 30 minutes or until a skewer comes out clean. The edges of the cake should pull away from the pan. (Check after 1 hour - top up the water if it's empty. If the outside of the cake is dry but the skewer is wet/cake jiggles lower the temp to 120C for the remaining time)
Once baked, leave in the pan for 5 minutes on your cooling rack. Then turn out onto a sheet of greaseproof paper and leave upside down to cool. This ensures a nice flat top.
Once cooled, wrap in clingfilm overnight to ‘settle’.
Once split, filled and iced, this cake will last 7-10 days and will freeze well for 3 months.
I'd say they turned out well.

6inch-chocolate-madeira-cake

6inch-and-8inch-madeira-cut
For the buttercream, I went with my old faithful Swiss Meringue Buttercream. I honestly rarely, if EVER, make standard buttercream anymore. SMBC is light as well as rich. It's a delight to flavour, colour and pipe. It is sturdy and stable and stands up to heat well. This was really important as we've had something of a hot spell this July.
I've seen an endless stream of Cake Decorators bemoaning the humidity, fondant woes and melting buttercream. I knew my SMBC would stand up to the heat and taste fabulous. I didn't have any trouble with my buttercream. I chilled it in the freezer for about 30 minutes before I covered the cake.
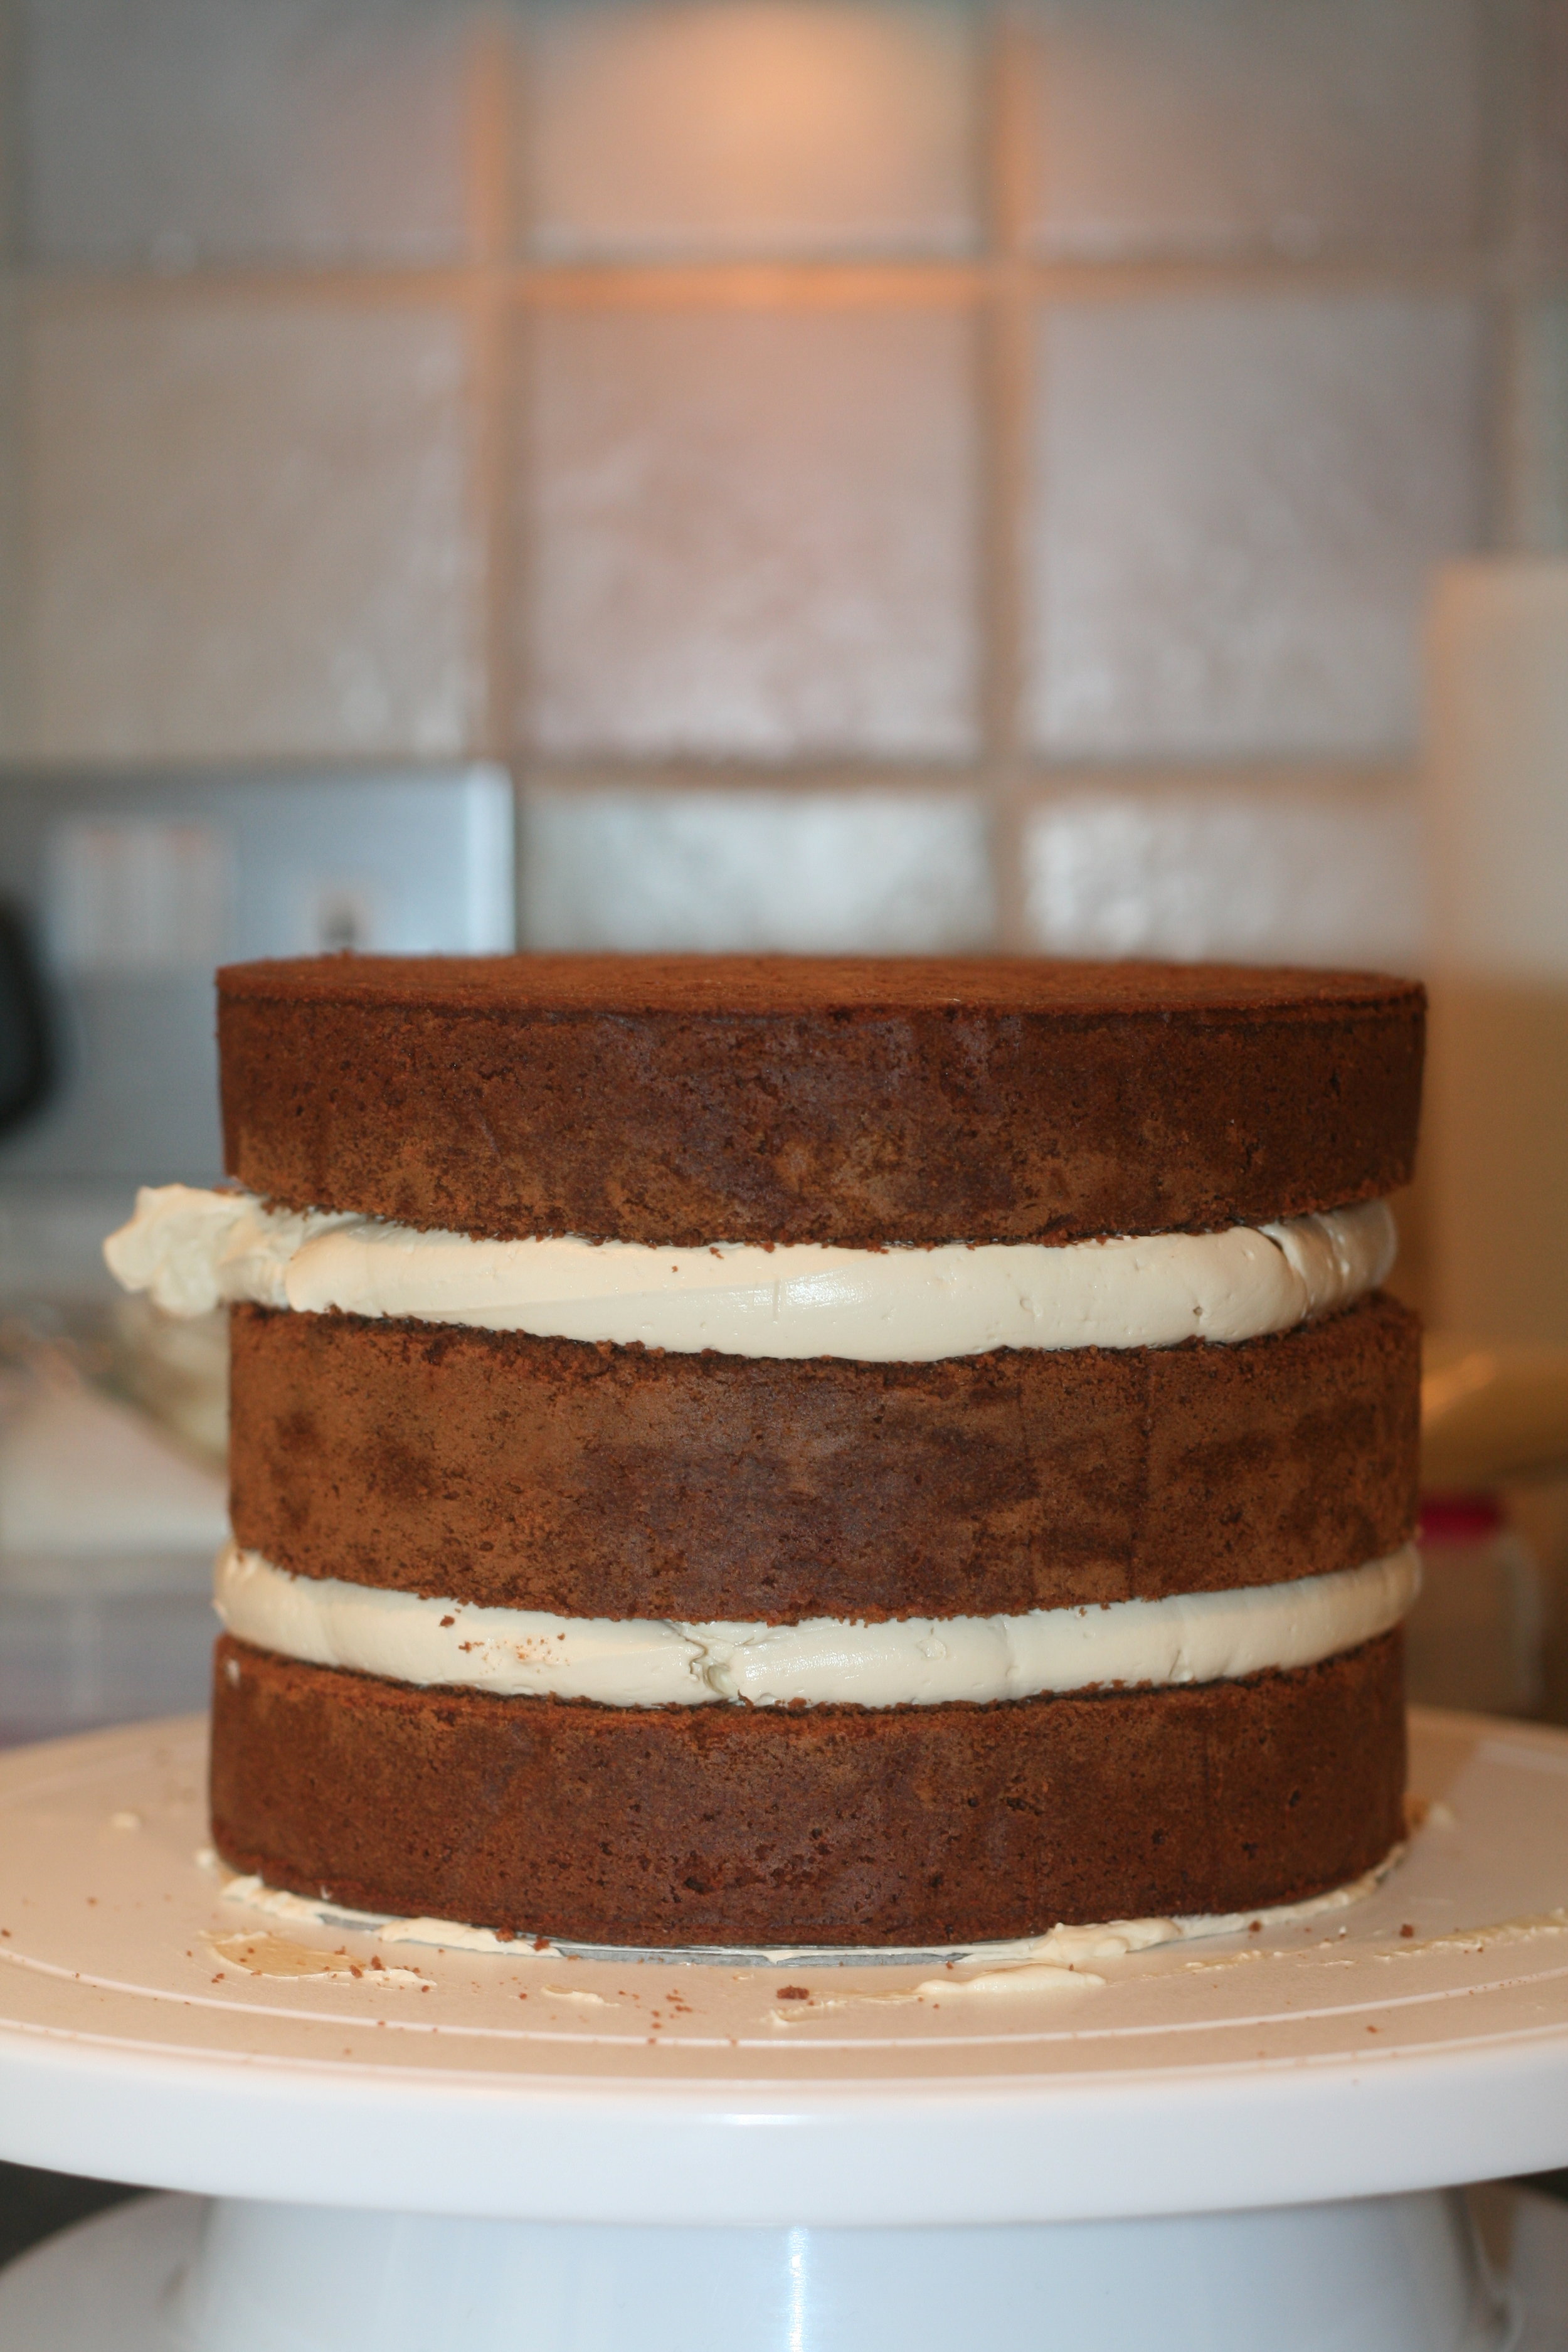
filled-chocolate-madeira
Decorating The Cake
The night I covered my cakes was pretty hot and my fondant threatened to dry out if I didn't work it quick enough.
I went for Karen Davies marshmallow fondant. I love MMF and have made my own, but I just wanted to take as much pressure as possible off myself for this cake. I tried Karen Davies Sugarpaste at Cake International last year and thought it was delicious, so I bought a load.
It coloured really well, although I did add a little too much pink for my bottom tier. It was supposed to be 'very pale pink' and looked great when I first coloured it. But, of course, food colours mature so it was brighter and deeper than I wanted.
The fondant did struggle a little in the heat, and I had to pull all the fondant off and start again on one tier. But if I moved quick enough it went on fine. No elephant skin. There were 2 tiny tears, but I made my first ever batch of Gunge and covered them. It wasn't too bad a job, you couldn't really tell where the marks were.
I could, they drove me crazy, but perhaps I'm being too critical.

6inch-chocolate-madeira-covered-in-pale-green-mmf
It smoothed well, though, once my fondant smoothers stopped sticking to the tacky fondant. It was hot and humid, so not the fondants fault. I popped a fan on my table and waited. It was a little nerve-wracking but worked out nicely.
The top tier had an indented and painted spider web pattern. I did this free hand, with a silicone cake tool and painted with some edible Rainbow Dust mixed with Revitiliser. The colour is 'Metallic Light Silver' but it came out MUCH darker than I was hoping. I'll test these things thoroughly in future!

8inch-chocolate-madeira-finished
I bought a wood grain impression mat and decorated the board with white wood grain. I've wanted to do that for ages, so this was the perfect excuse. I also made a fence panel template out of a flexible cutting mat. My mum (bless her) then helped me, in a little production line of the 2 of us, cut out the fence panels for the bottom tier, emboss them and stick them to the cake.
The number '5' was pale pink dots, on a white background, mounted on an oval of pale green. I put a bamboo skewer through the oval for support and to have something to insert into the cake.
I cut the little girls name using FMM Funky Letter Cutters, and I desperately wish I had positioned them better. That and I'd stack the top tier so the centre of the spider web lined up with the centre of the barn door. I also cut out lots of little flowers in the pink and white and dotted them all about. I loved that part.

Charlottes Web Birthday Cake
Honestly, I haven't enjoyed making a cake as much as I did this one. All the little fondant flowers, the models (which I don't usually do), the design process and seeing it come to life! It is very satisfying to have an idea on paper sitting in front of you in the flesh, or in the cake in this case
If you have any questions or comments about the cake, let me know below.
How to Make Icing - Every Kind of Icing
So much icing, so much choice. So which one is right for you?
Last time I talked about the difference in the terms 'icing' and 'frosting'. This time, let's have a look at the different types of icing, how to make them and when to use them.
This list isn't comprehensive, I'm sure any of you who have been to culinary school could name many I have missed, and please do! Add them in the comments. But this is a list of every type of icing I either have used or would like to give a go. All the icing I know about then really.
This is a BIG post, so settle in with a cup of tea, we're about to get sugary.
Royal Icing
Typically used for piping decorations or covering something like Christmas cake or decorating biscuits. If you don't colour it, Royal Icing is bright white and dries solid and crunchy. That means you can pipe little flowers or other decorations and keep them in a moisture free/air tight container for a long time.
For Piping:
675g icing sugar
3 free-range egg whites
3 tsp lemon juiceIf you want it to dry softer, more marshmallowy then add 1½ tsp glycerine once the other ingredients are all combined.
- Whisk the eggs until foamy and white but not solid.
- Add sieved icing sugar in gradually and fold together.
- Once all the sugar is combined add the lemon juice and any colour you would like.
Because this is designed to set hard for decoration, if you leave it out, it'll dry on you so keep it covered! This is the icing used for all that incredible lacework piping, brush embroidery and fancy beading. Not to mention being 'decorator glue' it's a super strong cake adhesive. So you can use it to mount edible decorations on your cakes.
Thin it out a little for 'flooding' biscuits but keep it thicker to pipe lettering. It's the original 3D printing!

royal-icing-excellence
Glace Icing
Great for pouring, especially for that dripping effect. People top fairy cakes with it and dribble it on biscuits. While this does 'crust' over it rarely goes completely hard all the way through.
100g icing sugar
15ml water/fluid
- Simply mix together until combined and smooth, not grainy.
You don't have to just use water, it can be fruit juice for flavour and mild colour. Some people use milk. You could use coffee or anything fluid (and edible). If you add food colouring, then reduce the amount of other liquid or it may be too runny. This icing is nice and shiny and great fun for kids.
Oh, and it's what you 'glaze' donuts with too!

Glace-icing
Buttercream
This basic buttercream recipe is only one in a whole delicious family. There are other, more elaborate versions, whose texture and density are different.
600g Icing Sugar
250g Softened Butter
1 tsp Vanilla Extract/Vanilla Bean Paste
2 Tbsp Full Fat Milk or Cooled Boiled Water
- Using a stand mixer or hand mixer (or incredible arm muscles) beat the Butter until creamy, fluffy and paler in colour.
- Add in the Vanilla and Sugar (gradually) until fully combined.
- You will need the mixture to be creamy and soft for piping or spreading between layers of cake so add the milk in a little at a time until you have a pliable consistency. You may not need all of it, that will depend a little on the temperature / humidity wherever you are. You do not want this to be runny. If it gets too thin try chilling it in the fridge or adding more icing sugar a little at a time.
This is where we cross over into "Frosting" territory. A spreadable, pipeable cake covering with a butter and sugar base. It could also have cream cheese which is delicious. For a lighter, fluffier and frankly more delicious buttercream make it with a meringue base. This is where we start getting sophisticated.
There are a number of meringue-based buttercreams. If you're only familiar with meringue as the crunchy white stuff in a pavlova or gooey fluff on top of a Lemon Meringue Pie then you're thinking too far along in the meringue making process. I will do another post on the various meringue buttercreams as they are my absolute favourite, there isn't enough time to talk about them now and they deserve their own stage.
American buttercream, which broadly speaking is Frosting, typically includes one special ingredient. Many 'frosting' recipes or American Buttercream recipes include 'Shortening'. For those of us not raised in the US, shortening is refined white fat. Specifically refined vegetable fat. Refined animal fat is lard. You heard me, LARD! And there are lots of reasons to use lard, but PLEASE do not put it in your buttercream. I use refined vegetable fat to grease my fondant mats and molds, loosen up my fondant and make dumplings, pie crusts and more! The most famous brand here in Blighty is Trex, but there are others. I feel genuinely unwell at the idea of mixing that in with butter and sugar to spread on a cake! It's just fat. Bleugh.
The above link uses Palm Shortening, which is presumably derived from same plants we get Palm Oil and Palm Sugar from. That sounds much more palatable. And if you are looking to increase stability and whiteness but don't want to use vegetable fat you could use set coconut oil. It's white and melts at a high temperature. It also tastes a little bit of coconut (obviously)

plate of cupcakes with different types of icing
Fondant
The apex (for me anyway) of cake decorating. Here we really have 3 things, Fondant and Sugarpaste and then Gumpaste. The first 2 are the same stuff, and that's what we will be talking about. Gumpaste however, is basically Sugarpaste but with 'gum' added. Either naturally occurring Gums derived from trees or Tylose, an artificial gum, which comes in powder form. This makes it harden or dry out faster. This is best used for crafting things like flowers, figures or bows and covering cake boards rather than a cake itself.
For me, there are 2 ways to make fondant, with Marshmallows and without. I have a separate post on making MMF or Marshmallow Fondant (gosh, I do talk about icing a lot don't I), but here is the traditional kind.
1025g Icing Sugar (sieved, yes really)
1 tbsp gelatin
60 ml or 3tbps of Water
170g of Glucose or Corn Syrup
1 tbsp Glycerine
2 tbsp Trex (refined vegetable fat / shortening)
1 tsp of Lemon, Orange or Almond Extract - optional
- First prep your gelatine. Put your water on a bain-marie on a gentle simmer in a metal or glass bowl. Add the gelatine and let it soak for about 5 minutes. Don't hard boil it or the gelatine will be unusable.
- Mix in the Glucose/Corn Syrup and Glycerine gently.
- Then add in the Trex, gently stirring until it is melted.
- If you want to colour or flavour your fondant, do that now. It's much less work than kneading it in later.
- Put your sieved icing sugar into a big bowl and make a well in the middle. Add the gelatin mixture and mix together with a non-stick utensil. Either a heatproof silicone spatula or grease your wooden spoon with a little Trex. Mix until it comes together. It won't be fully integrated and smooth, just yet. This part is a little like the first stage of making bread.
- You can do this part in a stand mixer with a dough hook or paddle but don't overwork it. You will also still have to finish it off by hand. I've never had a totally smooth fondant straight out of the mixing bowl.
- Once it is holding together tip it out on a non-stick surface. Whatever you have, a wooden cutting board, decorator mats or plastic/stone worktop - grease it with Trex. You won't regret doing it. Knead until smooth and flexible. Wrap in cling film and/or sandwich bags - it can't hurt to pop it in an airtight container too.
- Don't refrigerate this, keep it in a cupboard. Making it cold means it'll get damp when you bring it back up to room temperature, and that will make it sticky.
There is SO much to say about this. Firstly, this is a complete Fondant recipe, from scratch. You can buy Fondant Sugar, which is the same consistency as Icing Sugar or Confectioners sugar and add water to it. That makes rollable Fondant, at about 1tsp of water for every 50g of sugar it's easy to make.
Secondly, we are a Pork-free household in my home, and MOST commercially available gelatin is Pork based. You can get Beef gelatin, but I've found it is much more expensive. You can also get vegetable based gelatin derived from seaweed. I've heard horror stories about using it for some things and great praise for others, I've never tried it so I'd love to hear if you have and how you got on. If you are making MMF, as Marshmallows are already made with gelatine and glucose (beef gelatine Marshmallows are readily available) that takes care of that part of the recipe. I prefer MMF for taste, texture and it's MUCH easier to make.
Also, I don't know why it offends me less to have Trex in a Fondant recipe than a buttercream one, but it just does. You can substitute it for butter, but don't expect your fondant to be bright white, it will be ivory. If you are colouring it anyway then this doesn't matter too much.
You can find Corn Syrup in some large supermarkets, but I haven't seen large quantities of glucose anywhere but cake shops and online. If you do use Corn syrup then use less water, it's runnier so you won't need as much fluid. I use a brand called Karo, and I buy the light kind. It has less sugar, which seems a bit redundant considering all the other sugar, but that's my brain for you. It's also clear, which is very important when making white fondant. Many corn syrups or other plant based syrups, like Agave, are either slightly yellow or slightly brown. That's fine when substituting it for sugar in a cake, but it will affect the colour of your fondant.

fondant-icing
Pouring Fondant
This I've seen mostly used for petit fours or glazing, but you can use chocolate for those too and that's easier to make! In my head, this sits in the realm of the patisserie and is therefore beyond my skill level. For now anyway.
750g icing sugar, sifted (yes, you really do have to sift it)
125ml water
2 tablespoons golden syrup (or other plant based syrup, as long as it is viscose)
1 teaspoon almond extract
- Mix the sugar, water and syrup in a saucepan over a medium heat, stirring constantly.
- When the mixture reaches 35°C (use a Candy thermometer) and is fully mixed take it off the heat. Be careful, a saucepan of boiling sugar is a hospital trip waiting to happen
- Add any colour or flavour now and mix gently (but quickly) so as not to crystallise the mix
It should be runny, so you can pour it over a cake but not so thin that it'll just run off and not stick at all. Also, if you are pouring over a cake you have covered in buttercream, allow the mixture to cool first. You can colour or flavour this however you want, making it great for decorating.
It can set glossy or mat. It will firm up and crust as it dries, so cracks beautifully when eaten. But it won't be hard.

pouring-fondant
Honourable Mention - Ganache
My new best friend. Ever since I took a class in covering cakes in ganache I have been torn. I'll admit it, I've totally been seeing ganache behind buttercreams back. I am still in love with the Meringue Buttercreams, though.
Ganache is really versatile, you can make it a thin glaze and pour it instead of Pouring fondant, it is gorgeous for dripping over the edges of cakes in place of Glace Icing. You can make it thick to fill and cover stacked cakes or whip it up to pipe on cupcakes instead of buttercream. Plus, you know, it's chocolate.
So with that in mind - and the fact that this is a crazy long post already, I'll do a separate post on Ganache to do it justice.
What is your favourite kind of icing? Have you used any of the above in a 'non-traditional' way?
*Header Image: Royal Icing by A Passionate Plate - Glace Icing by Dough It Yourself - Buttercream by Martha Stewart - Fondant by Cookies Cupcakes and Cardio - Pouring Fondant by Auifine Foods